AutoFishScalers.com - Commercial Electric Fish Scalers & Pin Bone Removers

Commercial Electric Fish Scalers, Skinners & Pin-Bone Removers


After scaling tons of fish by hand for many years, I'll never go without one of these again.

B.C., Hull's Seafood Market 10/13/2022

WORLDWIDE SALES

Veteran Owned Small Business

Veteran-Owned

(800) 939-6811

Need help? Call or Email

info@autofishscalers.com

8:30 to 5:00  M-F ET


Finding you guys may have been the discovery of my month!
D.Y., Hawaii 7/13/2021

KT-S Drive Shaft and Casing Replacement

____

If your KT-S is not working, it is almost certainly because:

1. The drive shaft has broken, or

2. The casing is not connected properly to the motor or the hand-piece.

This will guide you through the steps to troubleshoot the problem.

•••••••
REPLACING THE DRIVE SHAFT

If the motor is running but the spindle is not turning, it is normally because the drive shaft is broken and needs to be replaced. It could also be that the hand-piece is not properly attached to the casing. Follow these steps to see.

1. Remove the 2 bolts that connect the casing to the motor. Remove the drive shaft from the casing. If the shaft is broken, replace it and continue this process.

2. Inspect the casing. If it is damaged in any way, holes, tears or kinks, it should be replaced. SEE REPLACING THE CASING BELOW.

If it is OK, check to see that the plastic base of the shaft is properly attached to the casing by a washer and circlip. It should look like this:

Image of Drive Shaft for cable replacement

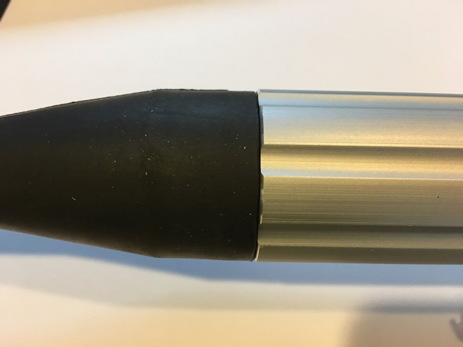
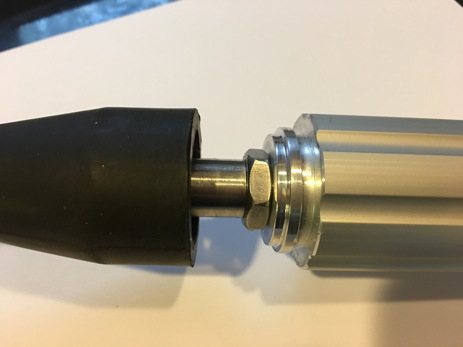
3. Next, check to see that the hand-piece is securely attached to the rubber casing on the other end. There should be no space or flexibility between the hand-piece and the casing. If there is any play, see how to check the connection between the casing and the hand-piece in REPLACING THE CASING BELOW. It should look like this:

4. If all parts are OK, lubricate the new shaft with grease and then put it into the casing. Make sure it is in all the way (turning the cable end should turn the scaling spindle). Reattach the casing to the motor with the 2 bolts. Test. You are done.

REPLACING THE CASING/TROUBLESHOOTING

1. If the spindle is not turning properly and you have checked the metal shaft, you should check the connection between the hand-piece and the casing as shown below. If that does not fix the problem, the casing should be replaced.

To replace the casing, remove the 2 bolts that connect the casing to the motor. Remove the drive shaft from the casing.

2. Next, remove the hand-piece from the casing. To do that, you will have to remove the Reinforcing Rubber end piece.

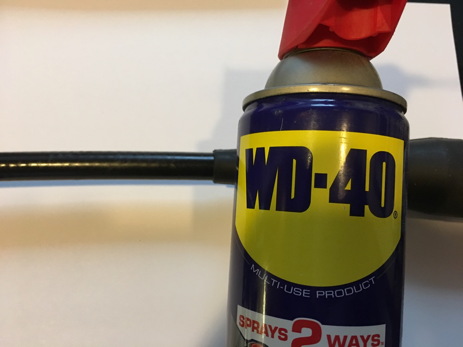
a. Spray some WD-40 on the casing just below the rubber end piece. It will not slide otherwise.


b. Use a dull knife to pry the upper edge of the Reinforcing Rubber end piece off the raised ring on the hand piece, then slide it down the casing so that you can see where the casing attaches to the hand piece.


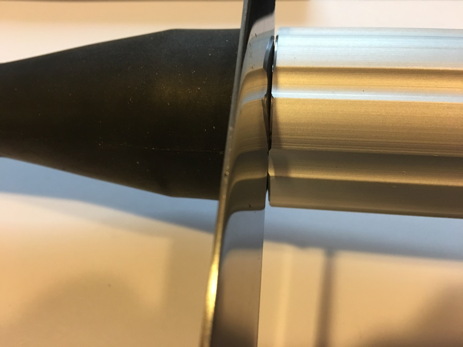
c. If any casing threads are showing (as shown below) it needs to be tightened. Screw the nut down onto the casing as far as it will go by hand. Then screw the hand piece down. Tighten the nut with a wrench.


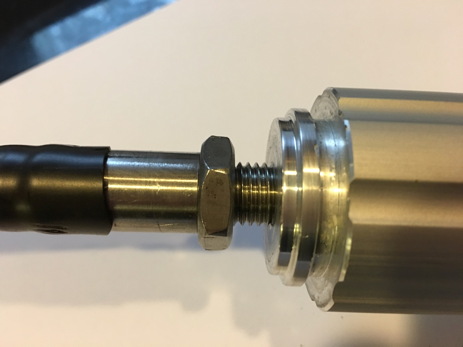
d. It should look like this, with the nut tight on the casing and the hand piece tight on the nut. If this was loose and the casing otherwise looks OK, you may not have to replace the casing. If so, put in the new lubricated drive shaft, test by hand to see if turning the shaft turns your spindle, and if it does, reattach. If not, continue on with replacing the casing.


e. Slide the Reinforcing Rubber end piece back onto the hand-piece by twisting it to slide over the raised ridge. It should look like this when properly done.


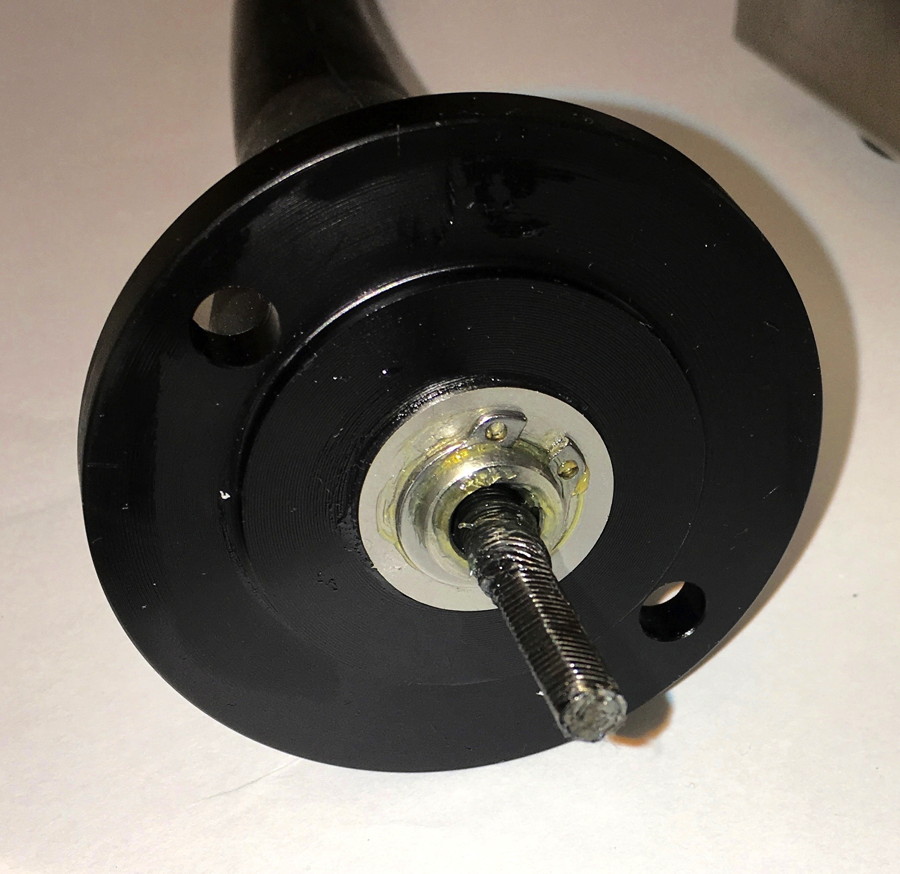
3. Next, remove the plastic base. You will need circlip pliers to remove the circlip. Be careful not to stretch the circlip out too far or it will break. (It is a 12mm circlip, part 54). Remove the plastic base from the casing.

4. Install the new casing. Note that you will have to trim a bit of excess rubber on both ends (see the pictures above.

5. Put the plastic base over one end, then the washer and then the circlip which fits in a groove on the casing (see top picture). You will need the circlip pliers to do this.

For the hand-piece, screw the nut up as far as it will go, then screw the casing on as far as it will go by hand. Tighten the nut with a wrench. No threads should be showing.

6. Lubricate the new shaft with grease and then put it into the casing. We recommend the this Food Grade Super Lube Grease available from Grainger. This SuperLube grease should be available in most countries.


Make sure it is in all the way (turning the cable end should turn the scaling spindle). Reattach the casing to the motor with the 2 bolts. Test. You are done.

OUR FISH SCALERS AND PIN-BONE REMOVERS

We sell high-quality commercial fish scalers and commercial pin-bone removers for companies and markets that process fish. Our products are reliable and very durable.

NATIONAL DISTRIBUTOR

In the United States we are a national distributor for KT-S fish hand scalers, EXOS and Ryco automatic pin-bone removers and Trifisk automatic fish scalers.

SHIPPING & INTERNATIONAL DISTRIBUTION

In addition to sales in the USA, we have shipped electric fish scalers and pin-bone removers to many countries world-wide, including Australia, Bahrain, Canada, Dubai, Estonia, Finland, Kazakhstan, Mexico, New Zealand, Qatar, Saudi Arabia, Thailand, and the UK, among others. Call or email for a quick quote.